> For the complete documentation index, see [llms.txt](https://doc.realvirtual.io/llms.txt). Markdown versions of documentation pages are available by appending `.md` to page URLs; this page is available as [Markdown](https://doc.realvirtual.io/basics/user-interface/move-pivot-points-pro.md).

# Move Pivot Points (Pro)

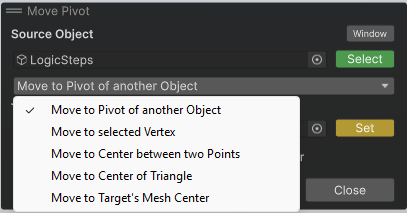
The Move Pivot tool provides precise control over GameObject pivot points and positioning within the Unity Editor, specifically designed for realvirtual automation components.

## Overview

The Move Pivot tool is a specialized Unity Editor window that allows you to reposition GameObjects by aligning them to specific vertices, midpoints, or other objects' pivot points. This tool is particularly useful for precise positioning of automation components, sensors, and mechanical parts in industrial simulation environments.

{% hint style="info" %}
This feature is only available in the realvirtual Professional version.
{% endhint %}

The tool supports three primary positioning methods:

* **Vertex-based positioning**: Align objects to selected mesh vertices with single-point, two-point midpoint, or three-point center calculations
* **Object-to-object alignment**: Position objects relative to other GameObjects' pivot points or geometric centers
* **Circle and bore center detection**: Click a round surface and let the tool calculate its exact center, axis and radius — see [Circle and Bore Center Detection](#circle-and-bore-center-detection)

> **💡 Hint**\
> The Move Pivot tool respects Unity's undo system, allowing you to safely experiment with different positioning configurations.

## Opening the Tool

Access the Move Pivot tool through:

* **Menu**: **realvirtual** > **Move Pivot (Pro)**
* **Quick Access**: Available in the realvirtual quick tools menu or Scene View overlay

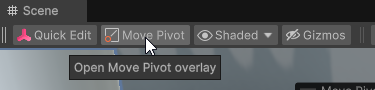
<figure><img src="/files/WZNHVu4e4Ba2Yc4PEyXf" alt="Move Pivot Overlay Button"><figcaption><p>Move Pivot tool accessible via Scene View overlay button</p></figcaption></figure>

The tool automatically selects the currently highlighted GameObject in the Hierarchy as the primary object to move.

<figure><img src="/files/AkmS7ktIhYwJSMCaBhMx" alt="Move Pivot Tool Interface"><figcaption><p>Move Pivot tool interface showing object selection and positioning options</p></figcaption></figure>

## Properties

### Object Selection

#### Object 1 (Target Object)

The GameObject that will be moved and repositioned.

* **Selection method**: Automatically uses the currently selected GameObject, or click **Reset** to clear and manually select a new target
* **Visual feedback**: The selected object is highlighted with visual indicators in the Scene View

#### Object 2 (Reference Object)

An optional reference GameObject for object-to-object alignment operations.

* **Selection method**: Click **Select Object2** and then click on the desired GameObject in the Scene View
* **Visual indicators**:
  * RGB-colored axes display the object's pivot point
  * White-colored axes show the geometric center

### Point Selection

#### Point 1, Point 2, Point 3

Individual vertex points selected from mesh geometry for precise positioning calculations.

* **Selection method**: Click the respective point button, then click on mesh vertices in the Scene View
* **Visual feedback**: Selected points are marked with colored gizmos
* **Precision**: Zoom in on target areas for more accurate vertex selection

## Editor Tools

### Interactive Gizmos

The tool provides real-time visual feedback through colored gizmos:

* **Object highlighting**: Target objects display selection indicators
* **Pivot visualization**: Colored axes show current and proposed pivot positions
* **Point markers**: Selected vertices are marked with distinct visual indicators
* **Alignment preview**: Visual guides show the results of alignment operations

### Scene View Integration

* **Click selection**: Direct vertex and object selection in the Scene View
* **Hover feedback**: Objects and vertices highlight when hoverable
* **Camera navigation**: Full compatibility with Unity's Scene View navigation

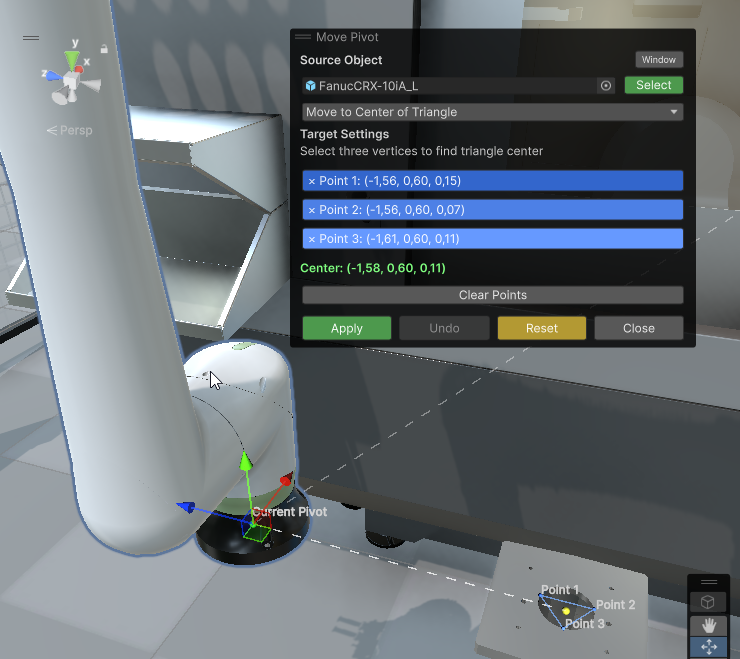
<figure><img src="/files/FFiVKlAK20x3LcNUS8k9" alt="Move Pivot Scene View"><figcaption><p>Move Pivot tool in action showing selected points, current pivot position, and visual gizmos in the Scene View</p></figcaption></figure>

## Usage Examples

### Single Point Alignment

Position an object's pivot to a specific mesh vertex:

1. Select the target GameObject in the Hierarchy
2. Open **realvirtual** > **Move Pivot (Pro)**
3. Click **Point 1** to activate vertex selection mode
4. Click on the desired vertex in the Scene View
5. Use the alignment options to move the object's pivot to the selected point

### Midpoint Positioning

Align an object between two vertices:

1. Follow steps 1-2 from single point alignment
2. Click **Point 1** and select the first vertex
3. Click **Point 2** and select the second vertex
4. Use the midpoint alignment option to position the object between the two points

### Three-Point Center Alignment

Position an object at the geometric center of three vertices:

1. Select your target GameObject and open the Move Pivot tool
2. Select **Point 1**, **Point 2**, and **Point 3** on different mesh vertices
3. Apply the three-point center alignment to position the object at the calculated center

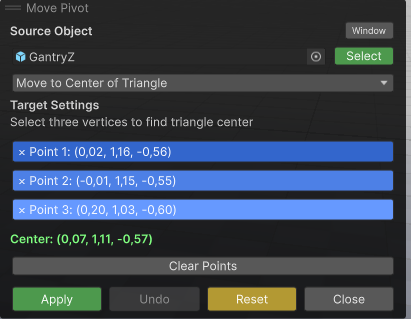
<figure><img src="/files/ZZeKjHQzdpkbC9b8QqJn" alt="Three-Point Center Alignment"><figcaption><p>Three-point center alignment showing calculated center position from selected vertices</p></figcaption></figure>

### Object-to-Object Positioning

Align one object's pivot with another object's pivot or center:

1. Select the target GameObject (Object 1)
2. Click **Select Object2** and choose the reference GameObject
3. Choose between:
   * **Pivot alignment**: Aligns Object 1's pivot with Object 2's pivot point (RGB axes)
   * **Center alignment**: Aligns Object 1's pivot with Object 2's geometric center (white axes)

## Circle and Bore Center Detection

{% hint style="info" %}
This method was added in realvirtual **6.3.6** (Professional), which is currently in beta and planned for the upcoming release.
{% endhint %}

Placing a pivot on the axis of a bore, a shaft or a cylinder is the most common reason to move a pivot on imported CAD — and the hardest to do by hand. The bounding-box center, a single vertex and a triangle centroid all lie beside the true center, because CAD tessellation is unevenly dense: the middle of a round face carries far fewer triangles than its rim, so any averaged position drifts toward the denser area.

**Move to Circle / Bore Center** removes the guesswork. You click the round surface once and the tool derives the exact center, axis and radius from the geometry itself.

### Quick Start

1. Select the GameObject whose pivot you want to move.
2. Open the Move Pivot tool and choose **Move to Circle / Bore Center** from the method dropdown.
3. Click the round surface in the Scene View — the cylindrical wall of a shaft or bore, or a flat face that contains a bore.
4. The detected circle, its axis and the resulting pivot position appear as gizmos. Check the reported radius and deviation.
5. Click **Apply**.

The detection runs on the click only, never while you hover, so large assemblies stay responsive.

### Properties

**Place at** (dropdown) Determines where along the detected axis the pivot lands: at the height you clicked, in the middle of the feature, or at either end. Use *Middle of extent* for a shaft that should rotate about its center, and *Clicked position* when the pivot belongs on a specific face.

**Surface angle** (degrees) The maximum angle between neighbouring triangles that still counts as the same surface, 35° by default. Raise it for very coarse tessellation, lower it if the detection runs across a chamfer onto an adjacent face.

**Align local axis to circle axis** (boolean) Rotates the object so the chosen local axis (X, Y or Z) points along the detected axis — the fastest way to prepare a part for a rotational **Drive**. This works when the circle sits on a *different* object than the one being rotated; aligning an object to a feature on itself is geometrically impossible, since the geometry turns with the object, and the tool tells you so.

### What the tool reports

The panel always shows the radius, the axis and the deviation of the fit. A small deviation confirms that the surface really is round and that the detection covered it completely.

If a reliable circle cannot be determined, the tool refuses to return a result and names the reason instead of silently placing the pivot somewhere plausible — for example when only part of the circle is covered, when the surface is curved but not cylindrical (a sphere, torus or free-form face), or when the surface is not round enough. Click a more complete round face, or raise the surface angle if a coarsely tessellated cylinder is being cut short.

### Automating it

The same detection is available to AI assistants and scripts through the MCP tool `transform_circle_center`, which takes an object path and a world-space ray and returns center, axis and radius. Interactive and automated results are identical, because both use the same detection core.

## Tips and Best Practices

### Precision Techniques

* **Zoom for accuracy**: Use Scene View zooming to ensure precise vertex selection
* **Multiple angles**: View selection areas from different angles to confirm correct vertex targeting
* **Grid snapping**: Enable Unity's grid snapping for additional positioning precision

### Workflow Optimization

* **Test before committing**: Use Unity's undo system to experiment safely with different positioning options
* **Scene organization**: Work with simplified scene views when positioning complex assemblies
* **Verification**: Always verify the selected object and intended pivot point before applying changes

### Complex Scenes

* **Object isolation**: Use Unity's isolation mode for complex scenes with overlapping geometry
* **Layer management**: Organize objects on different layers for easier selection
* **Naming conventions**: Use clear GameObject names for easier identification during selection

## Reset and Undo Operations

### Reset Functionality

The **Reset** button clears all current selections and settings:

* Deselects all point selections
* Clears Object 1 and Object 2 references
* Removes all visual gizmos and indicators
* Returns the tool to its initial state

### Undo Support

All Move Pivot operations are fully integrated with Unity's undo system:

* Use **Ctrl+Z** (Windows) or **Cmd+Z** (Mac) to revert positioning changes
* Multiple undo levels supported for complex positioning sequences
* Undo history preserved across tool sessions

## See Also

* [Unity Editor Tools](https://github.com/game4automation/doc/tree/doc/basics/editor-tools.md) - Overview of realvirtual editor utilities
* [Component Positioning](https://github.com/game4automation/doc/tree/doc/components/positioning-components.md) - Guide to precise component placement
* [Scene Setup Best Practices](https://github.com/game4automation/doc/tree/doc/basics/scene-setup.md) - Efficient scene organization techniques


---

# Agent Instructions
This documentation is published with GitBook. GitBook is the documentation platform designed so that both humans and AI agents can read, navigate, and reason over technical content effectively. Learn more at gitbook.com.

## Querying This Documentation
If you need additional information that is not directly available in this page, you can query the documentation dynamically by asking a question.

Perform an HTTP GET request on the current page URL with the `ask` query parameter, and the optional `goal` query parameter:

```
GET https://doc.realvirtual.io/basics/user-interface/move-pivot-points-pro.md?ask=<question>&goal=<endgoal>
```

`ask` is the immediate question: it should be specific, self-contained, and written in natural language.
`goal` is optional and describes the broader end goal you are ultimately trying to accomplish on behalf of the user. GitBook uses it to tailor the answer towards what is most useful for that goal.

The response will contain a direct answer to the question and relevant excerpts and sources from the documentation.

Use this mechanism when the answer is not explicitly present in the current page, you need clarification or additional context, or you want to retrieve related documentation sections.